
Until recently, using machine learning inside your products was not a small task. It required a data center with servers running all the times: dedicated space, memory and bandwidth. Now, using the power of machine learning, we can make new, empowering features directly on a user’s device.
Today, we’re showing you how easy it can be to run your own machine learning on a user device. In our step-by-step tutorial, we’re going to go from getting your data, to training your model on a Mac, to running an iOS app with your newfound powers. Read on for instructions!
Rise of Accessibility for Machine Learning
New tools are making machine learning opportunities more and more accessible. Apple has CoreML, a powerful framework optimized for Apple hardware. And Google has TensorFlow Lite models that are made to fit on phones. Both Apple and Google, at their respective annual conferences, dedicated a significant amount of time talking about how they’ve benefitted from moving machine learning to users’ devices, and how they’re empowering developers on their platforms to do the same. With machine learning on your device, you could add these features through your app:
- Voice control
- Facial recognition through an app
- Offline chatbots to assist with FAQs or onboarding
- Decipher text from signs for accessibility
- Scan and store text from business cards or important documents
- Translate text
- Recognize objects like cars and identify their make/model/type
- Convenient typing predictions
- Keyboards that autocomplete your writing in the style of a famous author
- Add never-before-seen filters to images
- Tag photos and videos according to who or what is in them
- Organize emails and messages by what is most important to you
Advantages of Machine Learning
- It’s scalable. As the number of users of your app grows, you don’t have to worry about more traffic with the server, or Internet connection points of failure. You don’t need to get extra memory and storage. And users avoid bandwidth issues because they don’t have to ping the Internet all the time
- It’s fast. You’re not hindered by internet latency because you are using hardware that is optimized for machine learning.
- It’s private. Your users can be rest assured knowing the information being analyzed is all private. You are not handling their data; everything is happening on their devices at their behest.
That said, there are still costs associated with machine learning. For example, creating the models that will be used on device still requires and depends on massive amounts of quality data and high powered machines. Yet even these features are becoming more readily available and easy to use.
Interested in seeing just how easy it can be? Follow our tutorial below!
Before Getting Started.
- It will be helpful to know a tiny bit of iOS development, including how to run an app on the simulator through Xcode.
- Also, familiarity with Swift Playgrounds is helpful but not required.
- Other than that, we’ll take you through the machine learning process one step at a time.
You can find the full code you’ll be writing at the end of this blog post.
Step 1: Getting the Data.
This tutorial focuses on a kind of machine learning called natural language processing (NLP) – which essentially means, “making sense of words.” Specifically, we will be doing a sentiment analysis. This is where we take a word or phrase and decide what feeling is associated with it. Great use cases for this functionality include marketing analysis of customer feedback, evaluating tester interviews for product design, or getting the lay of the land with comments left on user reviews of a product.
Let’s say you want to use sentiment analysis to organize or display messages on your new messaging app, or your new email client. You can group them by tone, or color-coordinated messages to give the user a heads up of what’s coming, or help them decide what they should answer right away, or whatever else you can imagine as a helpful feature. (And again, we can do all this by offloading the processing power and smarts to the users device without compromising other features users want, like end-to-end encryption).
First though, you’ll need to get the data. Ours will come as a CSV. Most major spreadsheet programs can open a CSV, so you can easily see what the data looks like.
As with any data, we want to be transparent with where we got our information. I’ve cleaned up the linked dataset, but the basics of it come courtesy of work done for this paper:
This dataset is basically the CSV form of a simple spreadsheet with two columns.
- One is labeled “sentiment” and is a column with values of either “Positive” or “Negative”. You may see this in other data sets as 1 for positive and 0 for negative, but for coding purposes we need to format as words instead of integers.
- The other column is the text of the review, and it is labeled “review” at the top. And there are 25,000 reviews! Go ahead and import this into a spreadsheet to see what it looks like.
This type of machine learning is known as classification and we’ll be making a classifier. The reviews are your “x” inputs, or features, and the “Negative”/“Positive” values – known as labels – are like the “y” values you get as output. Your target prediction is a “Negative” or “Positive” value.
Alright. So if you have downloaded the data, now it’s time to write some code to train the model.
Step 2: Training the Model
Training a model means giving our program a lot of data so that it learns what patterns to look for and how to respond. Once the model is trained, it can be exported as a file to run on a device. That means you’re not taking all those gigabytes of training data with you.
It’s sort of like pouring lots of water over a material to make a sculpture that has the right shape. Our training data is the water. The sculpture is the model. It’s what we’ll use once it is trained and in the right shape.
For this example, we’ll use an Xcode Playground, which is like a blank canvas that runs code and is very useful for experimenting.
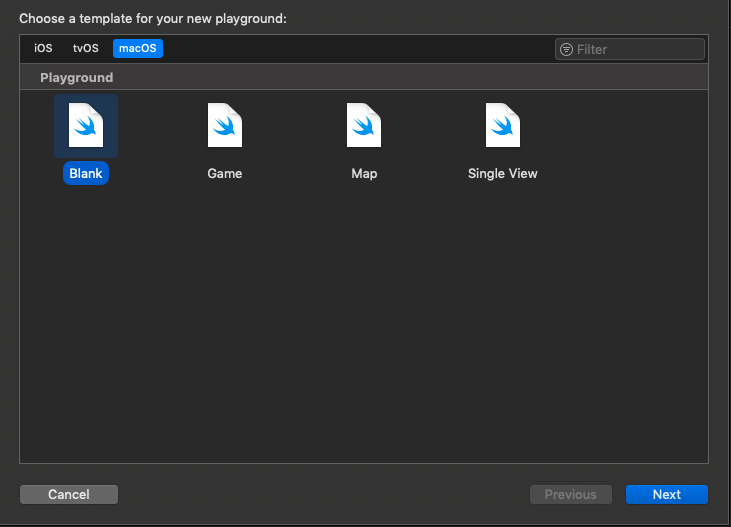
- Open up Xcode, preferably Xcode 10.2 or later. Your version of iOS should be at least iOS 11. In Xcode go to File > New > Playground. Use macOS as the template, and choose “Blank” from the options. Then click “Next.”
- Now it will ask you where to save the project and what to call it. I called mine “CreateMLTextClassifier”.
- Save your Playground. It will open up with some boiler plate code. Delete all of that code.
The full code for the playground is available at the end, but we’ll also take you step-by-step.
First we’ll import the frameworks we’ll need at the very top. Add this:
import CreateML
import Foundation
import PlaygroundSupport
Then we’ll create a function that will do the actual magic. Below your import statements, write:
func createSentimentTextClassifier() {

}
Now we’ll fill out this function. Write everything in between the brackets until told otherwise. The first thing you’ll write inside the brackets are:
// Load the data from your CSV file
let fileUrl = playgroundSharedDataDirectory.appendingPathComponent("MovieReviewTrainingDatabase.csv")
So we have this line, but in order to make it actually work, we’ll need to set up a folder with our CSV in the right location. What’s happening here is that the Playground is looking for a folder called “Shared Playground Data”. So go ahead and make a folder with that name in your “Documents“ directory, and then add the “MovieReviewTrainingDatabase.csv” to that folder. Now the Playground can find it!
Back to coding. Below the fileUrl lines you just wrote, add:
guard let data = try? MLDataTable(contentsOf: fileUrl) else {
  return
}
This takes the CSV file and converts it to a table format that the program knows how to handle better for machine learning.
Next, below the “guard let data …” lines you wrote, write:
// Split the data for training and testing
let (trainingData, testingData) = data.randomSplit(by: 0.8, seed: 5)
This will give you data for training, and testing. This will train the data with 80 percent of what’s in the CSV (that’s what the 0.8 means) and the other 20 percent will be used later. So it will go over and over the training data, now the testing data, which the classifier has never seen, can tell us how well the data would have done in the real world.
As a side note, it’s possible to train your machine learning model so many times on the same data that you “overfit” your model. This means it’s great at working with the training data, but it may not be great at generalizing outside that data. Imagine a facial recognition system that easily identifies my face, but when shown a new face it cannot recognize that it is even a face because it had only ever seen my face. Sort of like that.
Now, below the “trainingData, testingData” lines you wrote, write:
// Make the model
guard let sentimentClassifier = try? MLTextClassifier(trainingData: trainingData, textColumn: "review", labelColumn: "sentiment") else {
  return
}
This creates the untrained classifier and gets it ready with the trainingData we made earlier. CoreML already has something called an MLTextClassifier which is specifically meant for this kind of use. So we tell it that the column of our spreadsheet/CSV with our text is the column with “review” written at the top, and the “labelColumn” which will become the labels we’re trying to predict, are in the “sentiment” column of our spreadsheet/CSV.
Now below the previous lines write:
// Training accuracy percentage
let trainingAccuracy = (1.0 - sentimentClassifier.trainingMetrics.classificationError) * 100
print("Training accuracy: \(trainingAccuracy)")
This will let us know during training how accurate our model is getting. It should start small, guessing 50 percent, and then grow to high 90s.
Now below the previous lines write:
// Validation accuracy percentage
let validationAccuracy = (1.0 - sentimentClassifier.validationMetrics.classificationError) * 100
print("Validation accuracy: \(validationAccuracy)")
This tells us about how our validation is going. We have already divided the data between training and testing. Within testing, there is another process of dividing the data between training and validation, so that the data is trained a bunch, but when it comes time for fresh data before going over another cycle of training, we check the validation. It’s yet another standard step that helps avoid overfitting and other such problems.
Now below the previous lines write:
// Testing accuracy percentage
let evaluationMetrics = sentimentClassifier.evaluation(on: testingData)
let evaluationAccuracy = (1.0 - evaluationMetrics.classificationError) * 100
print("Evaluation accuracy: \(evaluationAccuracy)")
This finally tells us how accurate our testing data is after all of our training. It’s the real-world example scenario.
Now below the previous lines write:
// Add metadata
let metadata = MLModelMetadata(author: "Matthew Waller", shortDescription: "A model trained to classify the sentiment of messages", version: "1.0")
This is just metadata saying who made the model, a description, and the version.
And the last part of the function, below the previous lines, is:
// Export for use in Core ML
let exportFileUrl = playgroundSharedDataDirectory.appendingPathComponent("MessageSentimentModel.mlmodel")
try? sentimentClassifier.write(to: exportFileUrl, metadata: metadata)
This exports the model so we can drop it in for use in our app.
Now that you’ve made your function you’re ready to run it!
Below the brackets of the function write:
createSentimentTextClassifier()
Now run the Playground! It may automatically run, or you can press the play icon in the lower left corner.
You should see things like the training, validation, and evaluation accuracy pop up in the console. After everything was parsed and analyzed, my training took 8 seconds. My training accuracy was 100.0, and validation and test data evaluation were at around 88 and 89 percent, respectively.
Not a bad result! Even this tutorial on deep learning, a subset of machine learning, using a modest LSTM (“Long Short-Term Memory”) neural net got about 87 percent accuracy on the test data.
With less than 50 lines of code and about 8 seconds of training, we’ve analyzed 25,000 movie reviews and exported a machine learning model for use. Pretty awesome.
Step 3: Putting Machine Learning to Work
It’s time to get the app ready to use our new model.
I’ve made a skeletal app where we can enter some text, and then automatically evaluate it as positive or negative. With that basic feature up and running, you can imagine entering text from any source, knowing how to classify it, and then presenting it in the right way for the convenience of your user. (And in the future, if you have the labeled data, you could do things like determine whether something is or is not important, or divide text into more categories other than just “Positive” or “Negative”.) The project is available on GitHub.
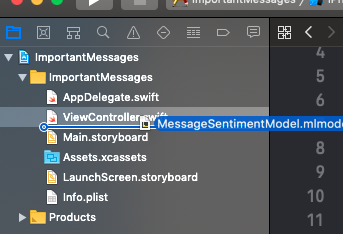
Once you’ve cloned or downloaded the project, open the project in Xcode. Next open a Finder window for the Shared Playground Data folder you created. Next, drag and drop the “MessageSentimentModel.mlmodel” file you created through the Playground into the Xcode project just below the ViewController.swift file.
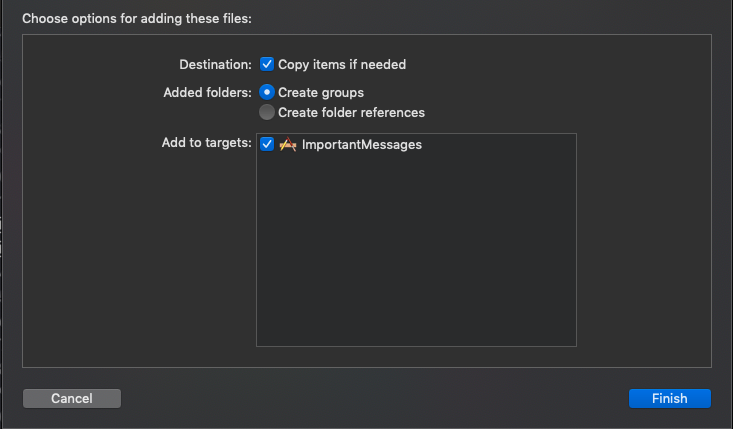
When it asks you how you want to import it, check all the checkboxes and use “Create Groups” from the radial options.
Now you’re ready to add the code to make the model work.
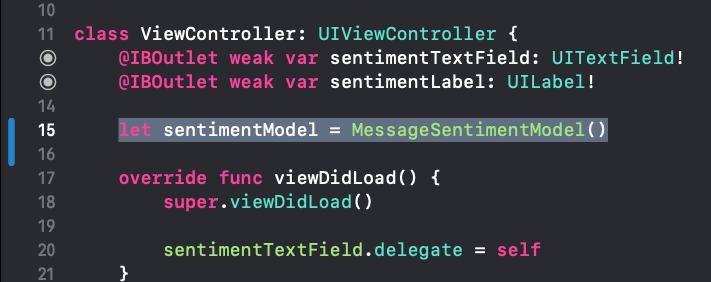
Go to the ViewController.swift file, and below “sentimentLabel” add:
let sentimentModel = MessageSentimentModel()
Next uncomment the code in “checkImportanceTapped(_ sender: UIButton)”
So with this line:
guard let languageModel = try? NLModel(mlModel: sentimentModel.model) else {
  return
}
This wraps our model in an even easier-to-use framework so that we can take the user’s input and update the text of the sentimentLabel in one line, like so:
sentimentLabel.text = languageModel.predictedLabel(for: text)
And it’s as simple as that!
Now let’s run it.
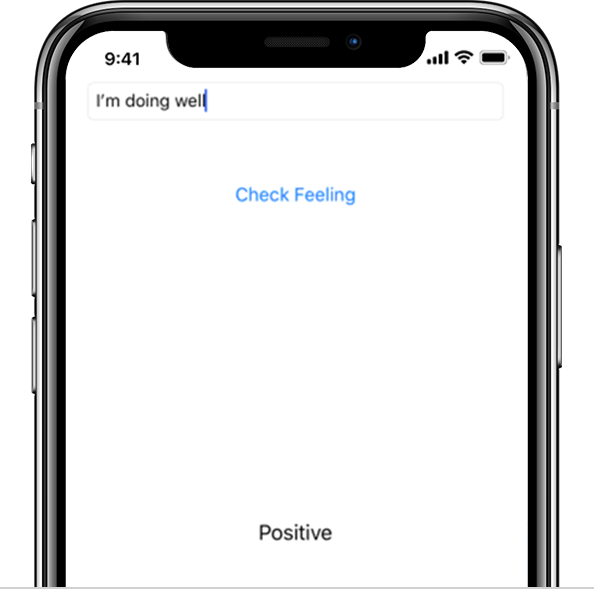
If we type in “I’m doing well” I get the label “Positive” at the bottom. So far so good!
And “I had a really bad day” is …

If we type in “I’m doing well” I get the label “Positive” at the bottom. So far so good!
And “I had a really bad day” is …
And now, we’re off to the races! Play around with it yourself!
I hope you’ve enjoyed this demonstration and primer on machine learning, and can imagine the potential of running AI on device. At Phunware, we’re always working for better quality code. That means figuring out how to apply the latest technologies (such as data binding) to challenging, often high-profile projects. In fact, Phunware’s Knowledge Graph uses machine learning and proprietary algorithms to curate over five terabytes of data every day from approximately one billion active devices each month. This data is then used to provide intelligence for brands, marketers and media buyers to better understand their customers, engage and acquire new customers, and create compelling user experiences.
Feel free to reach out with any questions about the myriad possibilities around mobile (or any sized screen) in this field or others. Thank you for reading!
Interested in joining the Phamily? Check out our latest job openings. We’re currently looking for Android and iOS software engineers!
Full Playground code:
import CreateML
import Foundation
import PlaygroundSupport

func createSentimentTextClassifier() {
  // Load the data from your CSV file
  let fileUrl = playgroundSharedDataDirectory.appendingPathComponent("MovieReviewTrainingDatabase.csv")

  guard let data = try? MLDataTable(contentsOf: fileUrl) else {
 return

  // Split the data for training and testing
  let (trainingData, testingData) = data.randomSplit(by: 0.8, seed: 5)

  // Make the model
  guard let sentimentClassifier = try? MLTextClassifier(trainingData: trainingData, textColumn: "review", labelColumn: "sentiment") else {
  return
 }

  // Training accuracy percentage
  let trainingAccuracy = (1.0 - sentimentClassifier.trainingMetrics.classificationError) * 100
 print("Training accuracy: \(trainingAccuracy)")

  // Validation accuracy percentage
  let validationAccuracy = (1.0 - sentimentClassifier.validationMetrics.classificationError) * 100
 print("Validation accuracy: \(validationAccuracy)")

  // Testing accuracy percentage
  let evaluationMetrics = sentimentClassifier.evaluation(on: testingData)
  let evaluationAccuracy = (1.0 - evaluationMetrics.classificationError) * 100
 print("Evaluation accuracy: \(evaluationAccuracy)")

  // Add metadata
  let metadata = MLModelMetadata(author: "Matthew Waller", shortDescription: "A model trained to classify the sentiment of messages", version: "1.0")

  // Export for use in Core ML
  let exportFileUrl = playgroundSharedDataDirectory.appendingPathComponent("MessageSentimentModel.mlmodel")
  try? sentimentClassifier.write(to: exportFileUrl, metadata: metadata)
}

createSentimentTextClassifier()


